


What is a Child Theme?
A Child Theme is a theme that inherits the styling and functionality of another theme, known as the Parent Theme. It is essentially a copy of the Parent Theme in which certain changes and customizations can be made without modifying the original Parent Theme.
What is a Child Theme needed for?
A Child Theme is useful when certain properties of an existing theme need to be overwritten or modified. For example, you can change the structure of a header or footer. A Child Theme is particularly useful when the required modifications go beyond the configuration options offered by the theme within the WordPress design area.
Advantages and disadvantages of a Child Theme
Since a Child Theme initially has the same functionality and appearance as its Parent Theme, modifications can be made to its appearance without changing the original theme (Parent Theme). This is particularly helpful for beginners because if something goes wrong, you can always return to the Parent Theme.
Since a Child Theme can more or less be considered a copy of a Parent Theme, the question arises as to why you should not make your customizations directly in the original theme:
One reason is that custom changes and modifications are overwritten every time the theme is updated. You therefore have to make your customizations to the theme again each time, or export them before every update and then import them again after updating. This is not the case with a Child Theme.
However, this also creates a disadvantage. Unlike Parent Themes, Child Themes do not receive updates. It is therefore your own responsibility to keep the Child Theme up to date from a security perspective.
How do you create a Child Theme in WordPress?
The first step is to connect to the server of the WordPress installation. This can be done via FTP, for example using FileZilla. An FTP account must be created for this purpose. The server address, a username, and a password must be provided.
Once connected to the server, navigate to the “Themes” folder within the WordPress installation ("Website Name" > wp-content > themes). This folder contains the directories of all themes available in the installation. To create a Child Theme, a new folder must now be created. It should contain the name of the Parent Theme followed by “Child” (for example, twentytwenty-child).
Next, open the newly created folder and create a file called “style.css”. This file must contain some general information within a comment. The following image shows an example.
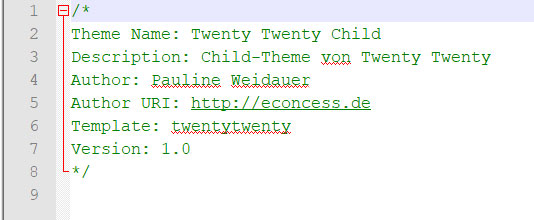
The styling of the Child Theme can later be modified in this file.
Next, a second file called functions.php must be created. The following code snippet must be added to it:
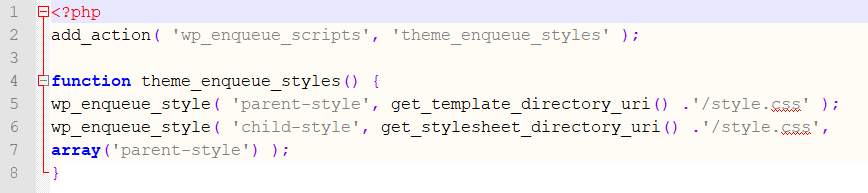
This code initially loads the styles of the Parent Theme and only then loads those of the Child Theme.
The Child Theme is now ready to use. Optionally, a Screenshot.png file can also be placed in the Child Theme folder. This allows you to give your Child Theme a preview image.
The Child Theme can now be activated in the WordPress backend under Appearance > Themes. Modifications can be made within the style.css file.
Find more articles about WordPress and other Content Management Systems on our blog.
If you would like to learn more about web design and User Experience Design, feel free to read more articles from our internet agency, such as "What Makes Good Design?" or "What Should Be Considered When Choosing Colors for a Website?".