

There is no one-size-fits-all formula in a design process that can simply be followed blindly. Every product is different, and therefore its development phase must also be adapted individually. The approach of a UX designer cannot therefore be generalized. In addition, every designer has different approaches and methods that have proven effective for them. Accordingly, this article is intended only to provide a brief overview of one possible design process and various methodologies.
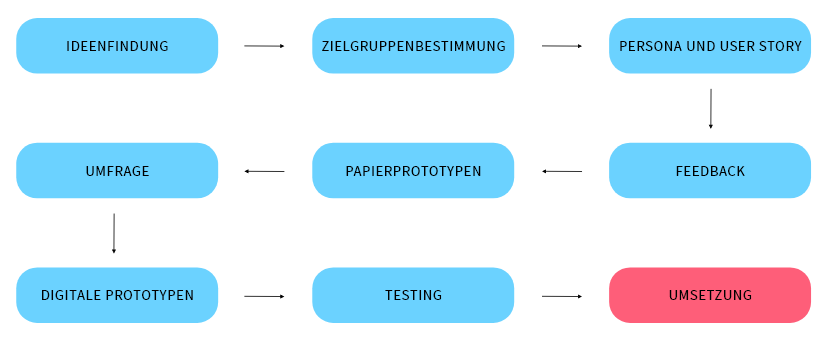
Ideation
The first step in any project is always an idea. However, this idea is still unrefined and needs to be developed further over the course of the process. Brainstorming is a good way to define it more precisely – preferably with several people. One person's suggestion can trigger a new thought process in someone else, perhaps leading in a completely different direction. Different people naturally have different, individual perspectives on a project idea and can therefore provide valuable input that one might not have thought of themselves.
There are many different techniques for capturing ideas during brainstorming. Whether in the form of a mind map, using Post-it notes, as a list of bullet points, or with the help of drawings, everyone has different preferences. There is only one important rule: Capture every idea. Even if one suggestion may initially seem completely nonsensical, it could prove useful in a modified form upon closer consideration or inspire another person to develop a new idea.
I would like to illustrate the rest of the process using an example. Let's imagine that we want to create a website with a blog and, during the ideation phase, we decided that the topic of this blog should be cooking and baking.
Defining the Target Audience
In the next step, we should consider which people we want to reach with our project – in other words, which target audience we want to address. This step is essential because the requirements for the product are based on it. In our case, our target audience will probably be predominantly female and mainly consist of people who already run their own household. However, we should not limit ourselves to the obvious and should also consider hobby cooks or people who occasionally bake a birthday cake.
Persona and User Story
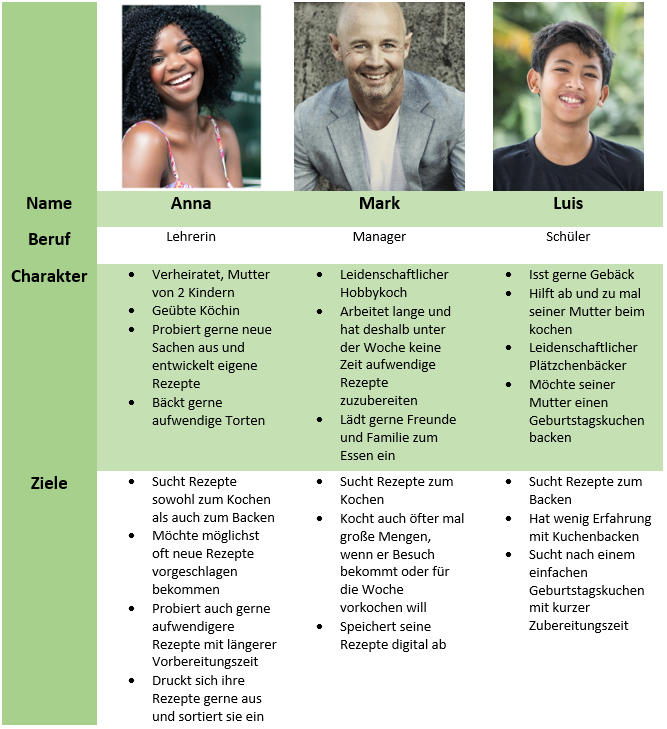
Once we have defined our target audience more precisely, we should think about the wishes, goals, and expectations of the people within this group. Creating personas can help with this. To do so, we develop several fictional people who are as different as possible but all belong to our target audience. We consider their background and story and create a kind of profile for each person. In our case, it could look something like this:
Survey
At this point at the latest, we should conduct a survey to find out whether the wishes and requirements of potential blog readers correspond to our ideas. We will quickly discover that this will not be the case, at least not 100%, and should then record the suggestions and ideas of the respondents and incorporate them into the rest of our design process.
When creating the survey, it is important to formulate the questions as precisely as possible, because the goal is to determine exactly what requirements and wishes our blog should meet. When selecting participants, it naturally makes sense to include people from our target audience. However, it can also be very informative to ask someone who is not interested in the topic at all.
The easiest approach is to test the survey with friends and family first. This allows us to see whether the questions are precise enough and also gives us the opportunity to receive responses both from people who belong to the target audience and from those who are not particularly interested in our blog.
Paper Prototypes
Now we can finally start working on the first designs. It is important to take everything we have discovered so far into account! As a first step, it is a good idea to create paper prototypes. These can be handmade models or simply sketches on paper.
The goal here is not to make them visually appealing – quite the opposite: At this stage, we should focus primarily on the functionality of the product. In our case, this would mean developing the basic structure for our blog website. We need to consider where the navigation bar should be placed and what it should look like, which content we want to include on our website and where, and which filtering options our blog should offer (e.g. preparation time, ingredients, difficulty, etc.).
At this stage, we should also decide which tool (e.g. Joomla, WordPress, etc.) we want to use to build our website so that we can take its capabilities and limitations into account during the design process. Therefore, it is worth considering this as early as possible.
Gathering Feedback
It is worthwhile to try out different designs and then gather feedback from friends, family, people from the target audience, and others. Once we have found a basic structure that we are satisfied with, it can be visually refined in the next step.
We can now determine the exact layout of the website, establish a color scheme, and perhaps start looking for suitable fonts and images. Creating a mood board can be useful here as a source of inspiration and should reflect the overall mood and atmosphere of our website.
Digital Prototypes
To get a better idea of what our blog will look like in the end, we need to digitize our paper prototypes in the next step. Programs such as Adobe XD are suitable for this purpose, as they can be used to create interactive mock-ups. Using various tools, we can recreate the structure of the website and even simulate the functionality of buttons and other interactive elements. This allows us to test the website layout in the next step without having to build the entire website first and potentially redesigning the whole thing from scratch.
Testing
The finished digital prototype can now be shared using a link, allowing other people who receive the link to test and evaluate it. After the test, we can incorporate the feedback into our current design and further improve and finalize it. If major changes are made, it is advisable to conduct another test once the revisions have been completed to determine whether they achieve the desired effect.
Implementation
The final step is to implement our finished design. We simply recreate our Adobe XD design in the CMS of our choice.
This is one possible way in which a website design process can work. However, the same principle applies here: Not every website is the same, so the approach needs to be adapted each time. For example, when redesigning an existing website, some of the steps described here may be omitted or shortened.
If you would like to read more about UX design, take a look at the other blog articles from our web design agency: "What is UX Design?" and "What Makes Good Design?"
For more information about design, visit our Design page, take a look at our agency presentation, or contact us directly.